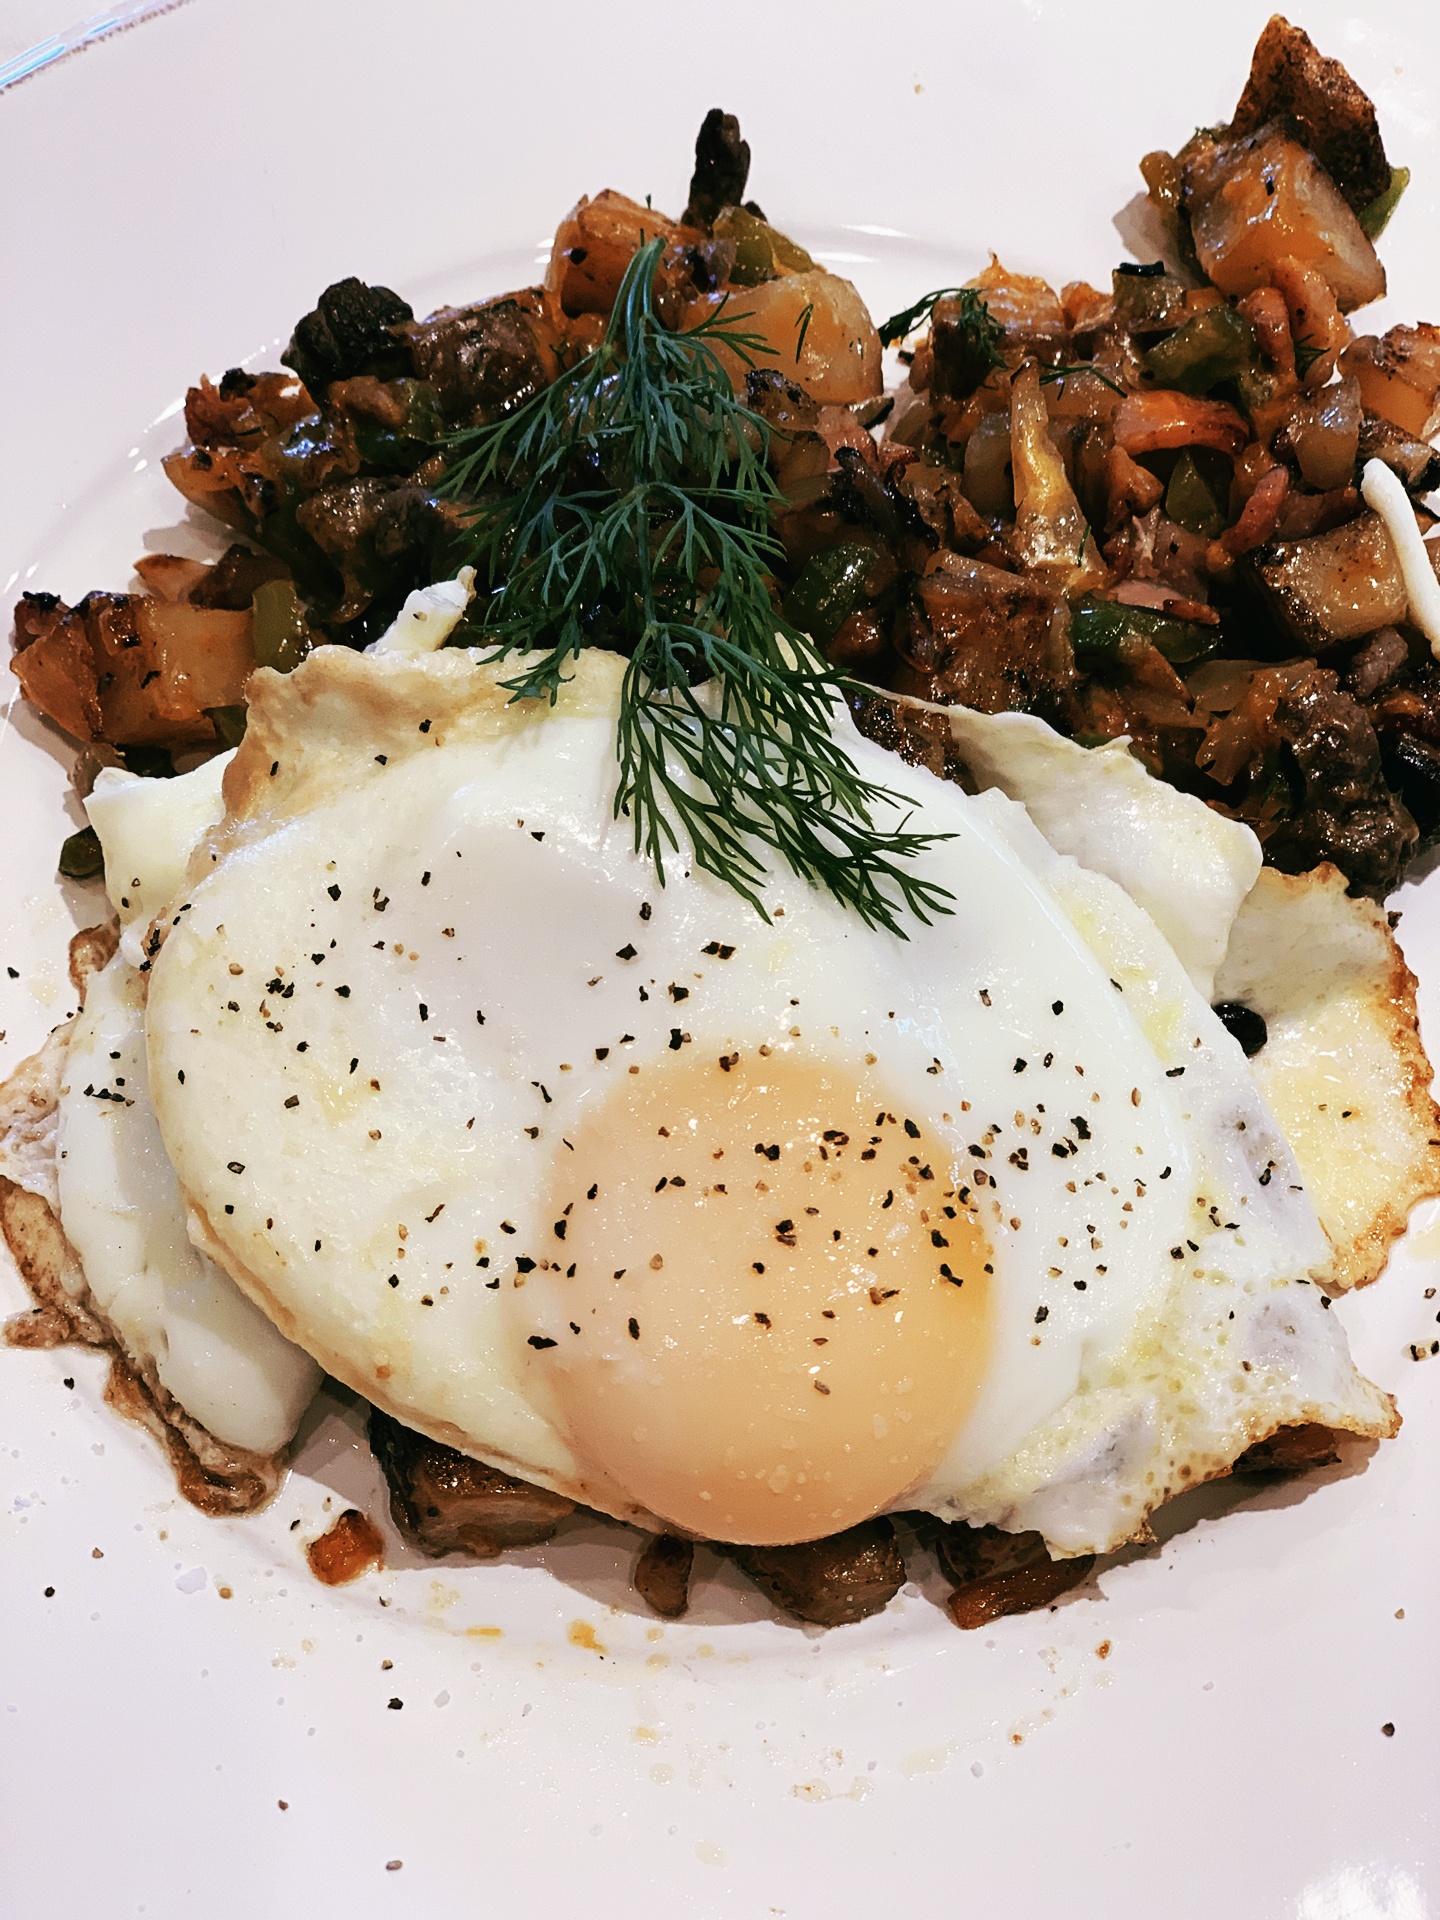
The other day, I was rummaging around in my fridge and discovered a treasure trove of leftover potatoes! Multitask those spuds with two different recipes sure to hit the spot. Click to skip to the recipe
I love potatoes.
I think this devotion stems from early breakfasts shared with my Dad.
To quell my then rebellious teenage persona, Dad would spend quality time with me on the weekends.
He traveled for his business during the week but was always home on the weekends. Saturday morning was our time.
We woke early (thus my lifelong habit) and drove to his office where he would catch up on paperwork and I would help him run job cost numbers.
First things first, we stopped for breakfast on the way. Many times, it was just to gather a box of donuts to share with the others in the office.
But SOMETIMES we would splurge and stop at the local Denny’s restaurant.
We would sit, sip really good coffee and Dad would order either a Denny’s Grand Slam or Denny’s Skillet breakfast. The grand slam loaded pancakes, eggs, bacon, sausage, toast, and fried potatoes onto one large plate. The skillet was just that, a cast-iron skillet loaded with potato and meat hash and topped with a couple of eggs – your way.
It’s been almost 20 years since my Dad went to heaven and my fondest memories still include the joy on his face as he tore into that meal.
The other day, when I was rummaging around in my fridge, I was delighted to find a treasure trove of leftover potatoes! I had leftover twice-baked from last Sunday’s potluck supper and a baked potato because hubby and I decided to split one instead of consuming a whole. And, I even had a mound of left-over smashed parmesan potatoes from Monday night’s meatloaf dinner. Eureka! It’s one of the good cook’s miracles that leftover potatoes will last a long time in the fridge, giving you an opportunity for a second dish with just a little effort.
So, with a nod to my Dad, and a love of leftovers, I have two dishes for you this week.
The first is a breakfast skillet made from the baked potato and enhanced with beef, bacon, peppers and onions and topped with a glazed egg. This is a hearty breakfast that is super served after an early morning hike or when combining breakfast and lunch into one leisurely brunch meal. The second dish was FUN. I used the inside of the twice-baked potato with the mound of mashed and made a potato croquette that was perfectly (and simply) fried crisp on the outside with a soft, almost gooey center.
Yumm oh yumm!
Breakfast Skillet With Glazed Eggs
Ingredients
A perfect use for leftover potatoes, feel free to add absolutely anything into your hash.
1 tablespoon olive oil
4 sliced bacon, diced
4 ounces beef (I used tenderloin, but you can substitute with ham, corned beef, or chicken, it’s your choice), about 1 cup
1 large baked potato, cooked and cut into ½-inch cubes, about 1 cup
1 green bell pepper, seeded and cut into ½-inch cubes, about 1 cup
1 white onion, peeled and cut into ½-inch cubes, about 1 cup
1 teaspoon kosher salt
1 teaspoon coarse black pepper
2 ounces sharp cheddar cheese, grated, about ½ cup
2 tablespoons chopped fresh dill
For eggs:
1 tablespoon butter
4 large eggs
Servings:
Time:
2
30-Minute Cuisine
Drizzle the olive oil in a skillet over medium heat. Add the bacon and beef. Cook until the bacon begins to crisp. Remove the bacon and beef from the skillet. Add the potato, pepper, and onions to the skillet. Season with salt and pepper.
Cook until the onions and peppers are soft, and the potato begins to brown, about 15 to 20 minutes. Add the bacon and beef back onto the skillet and toss. Scatter the cheese on top of the hash. Cover the skillet and cook to melt the cheese. Toss the fresh dill over the top.
Place the butter into a separate skillet (with lid) over medium heat. When the butter is melted, crack the eggs into the pan. Fill an empty eggshell half with water and pour this into the pan. The water will bubble up. Cover the pan with a lid. Lower the heat to medium-low. Coo the eggs until the yolks are just set, about 3 to 4 minutes.
Scoop out the hash onto a plate. Top the hash with eggs. Garnish with dill sprigs.
Mashed Potato Croquettes
Ingredients
Starting out with seasoned left-over mashed potatoes makes this an easy recipe to prepare. However, if you like to start from scratch, just bake a couple of potatoes and scoop out the flesh. You can season with salt and pepper and even add some sour cream or cheddar cheese. It’s all good!
4 cups left over mashed potatoes
1 large egg yolk, plus 1 whole egg
2 tablespoons all-purpose flour
3 tablespoons milk
2 to 3 green onions, thinly sliced
1 teaspoon kosher salt
1 teaspoon coarse black pepper
2 cups seasoned breadcrumbs
Canola (or vegetable) oil for frying
Yield:
Time:
1 Dozen 3-inch croquettes
30-Minute Cuisine
Place the mashed potatoes into a bowl. Stir in the egg yolk (reserve the white part), and green onions. Place the bowl into the fridge for a couple of minutes while you assemble the breading station.
Place the whole egg and the egg white into a shallow bowl. Beat with 1 to 2 tablespoons of water until combined. Place the seasoned breadcrumbs into another shallow bowl.
Remove the potatoes from the fridge. Use an ice cream scoop to form round potato balls that you dip into the egg wash and then the breadcrumbs. Transfer each ball to a parchment lined sheet pan or platter. When all the croquettes are formed, place them back into the fridge for 15 minutes.
Heat oil in a fryer or deep pot to 375°. Fry the croquettes in the oil a couple at a time until deeply golden. Transfer to a paper-towel lined platter. When all of the croquettes are fried garnish with a touch of sea salt and fresh herbs.
Make Ahead Tip:
You can make these ahead of time and store in an airtight container in the fridge. Bring them to room temperature before you fry.
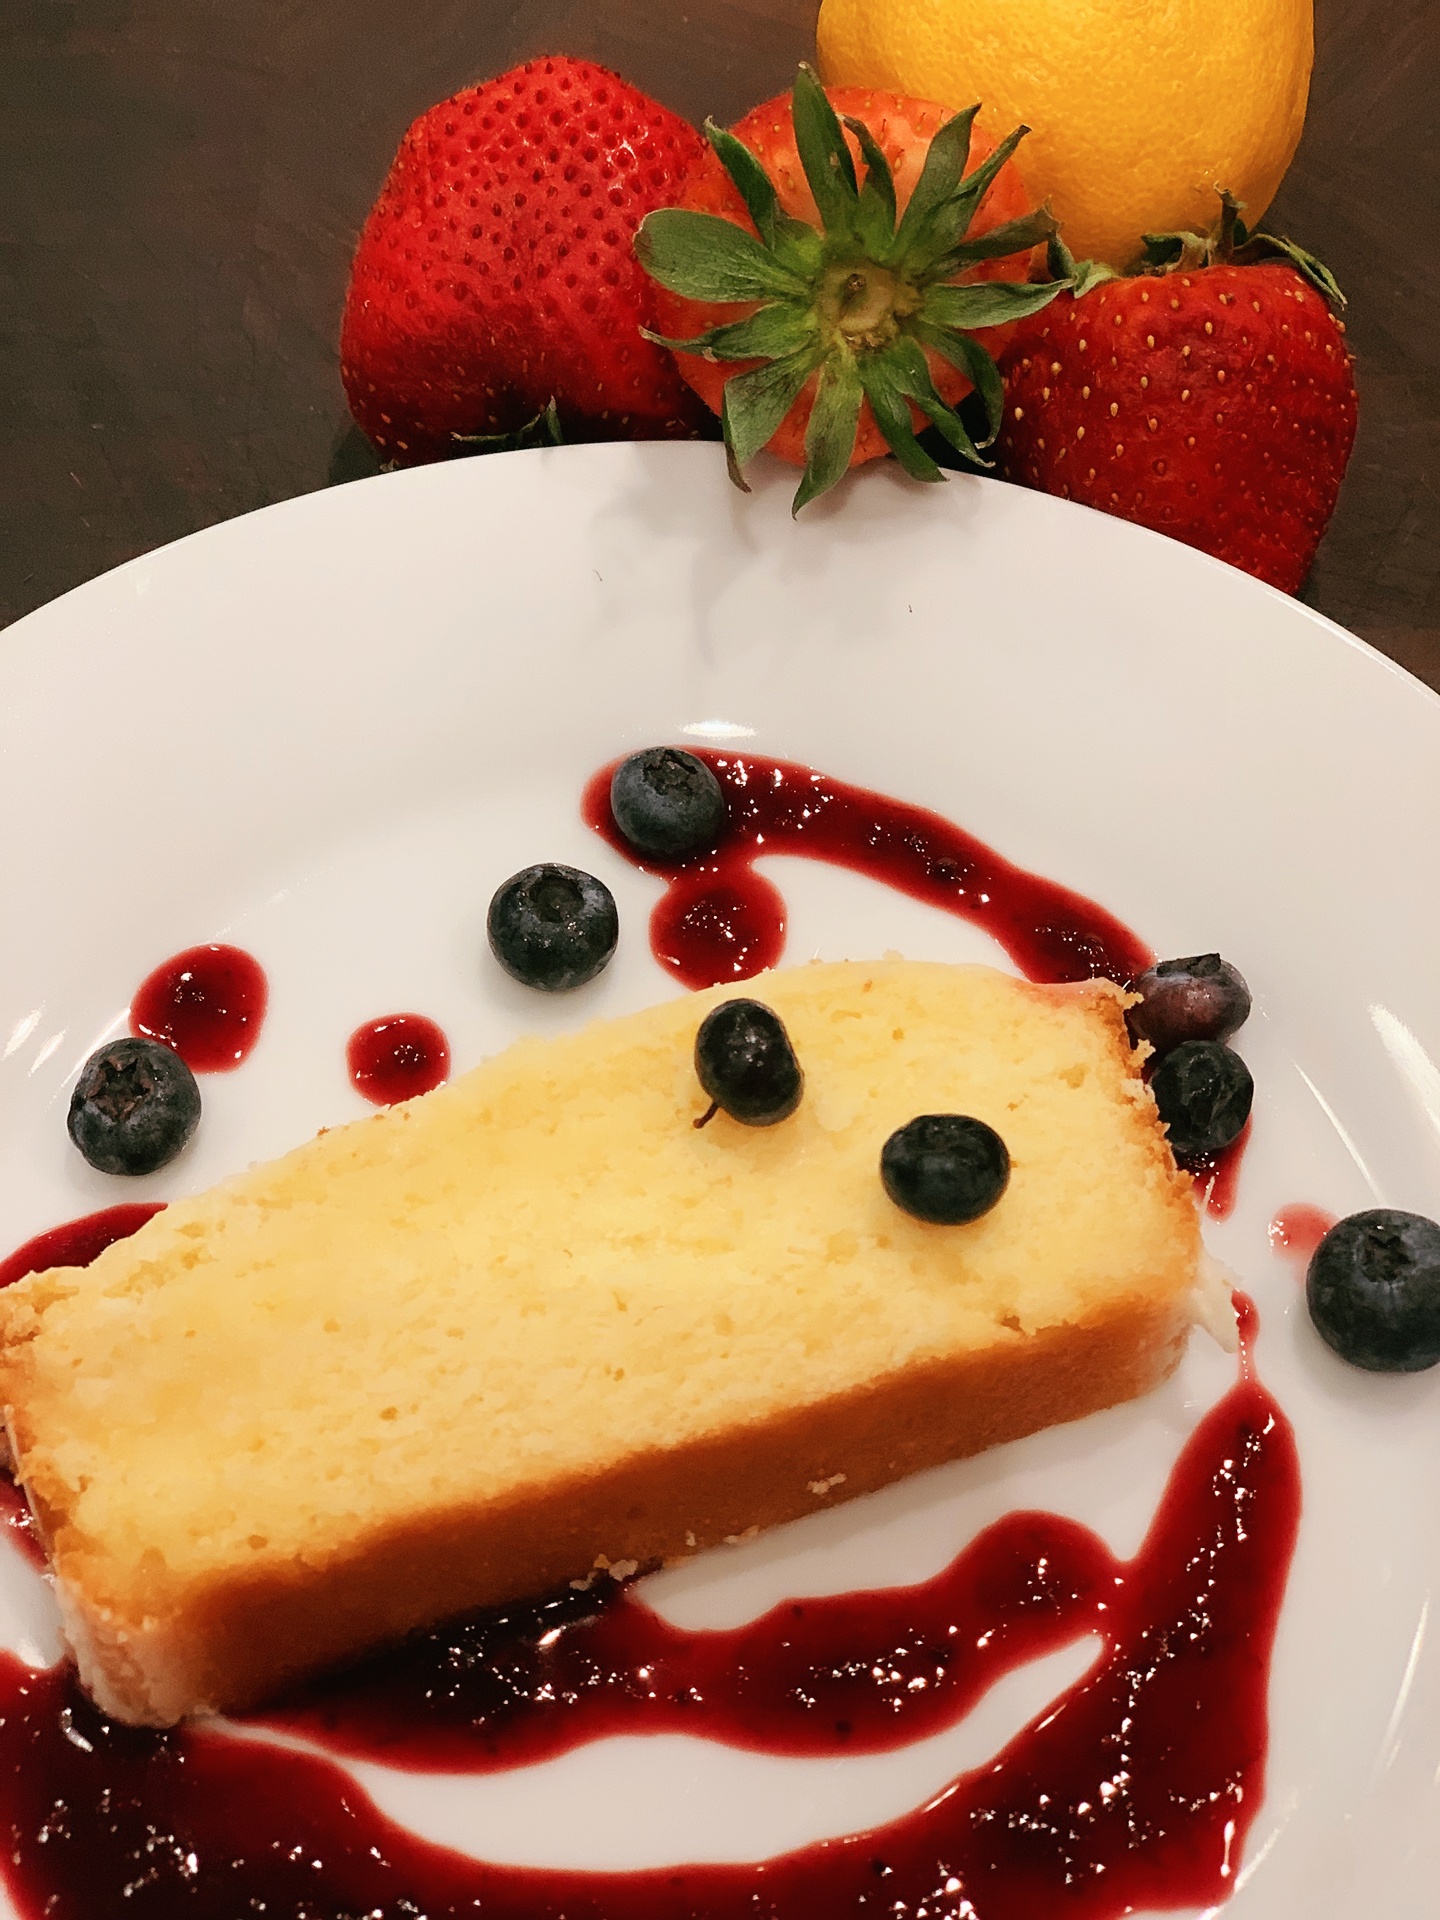
Spring means berries and cherries and all the delicious baking that goes with it! Even if you can’t go to the farm, let the farm come to you by way of your local grocer and get ready to cherry and berry. Click to skip to the recipe
When I think of Spring, I think about berry pickin’. When I was little, my grandparents had a huge garden. (They also raised pigs and chickens… but that’s another story.) In the garden we picked ripe strawberries from vines for Gram when asked.
We usually ate more than we turned over for Gram’s famous berry pies as was evidenced by our stained (and somewhat guilty) smiles.
At the end of Gram and Gramp’s long, dirt drive was a hedge of berry bushes. I think they were huckleberries, but they could have been blackberries. I remember my brother and sister and I would pick the berries and thread them onto long straws and then eat them like an ear of corn. Yumm! Many of these didn’t make it to the pies, either.
Luckily, Gram had nine grandchildren, and even given our full bellies, pies were baked!
Today, I love to take my grandkids to a strawberry patch at this time of year, but, in this climate of social distancing, the patches are devoid of pickers, yet abundant in berries. I recently bought a box of over-sized deeply red, ripe, strawberries from my grocery store. The handwritten sign told me that they came from a local farm, not but five miles away.
Which leads me to my berry recipes! The first is not a recipe. It’s a “just a little extra’ to your everyday standard.
I’m talking about blueberry pancakes with blueberry syrup.
Blueberry Pancakes with Berry Sauce
I add a dash of vanilla and a sprinkle of cinnamon to my standard boxed pancake batter. Then I substitute melted butter for vegetable oil. This creates rich batter for your cakes.
I reserve about twenty blueberries from a pint. The rest I place into a deep saucepan. Pour maple syrup over the berries and simmer on low until the berries break down. Be careful, the berry syrup can bubble up if you’re not watching. Turn off the heat so that the syrup cools down a bit.
Make the pancakes as you normally would, but place a few of the reserved berries onto each one before you flip it over. Stack the blueberry pancakes on a plate. Top with a dollop of butter and ladle warm berry syrup over the top. The cakes absorb the berrieness from inside and out! It’s a treat.
As you might imagine, I can find myself with a bunch of leftover berries. These, I freeze and use to make smoothies and sauces. My lemon cake is the perfect foil for an easy berry sauce.
Glazed Lemon Cake With Very Berry Sauce
Serves:
Time:
A crowd
30-Minute Cuisine, Plus 1 Hour Baking
Ingredients
This lemony cake with berry sauce is just puckerable enough to make it into the lip smackin’ category.
For cake:
1 ½ cup unbleached all-purpose flour
½ teaspoon baking powder
½ teaspoon kosher salt
¾ cup butter, 1 ½ sticks, room temperature
1 cup granulated sugar
3 large eggs
¼ cup sour cream
Zest from 2 lemons, about 2 tablespoons
Juice from 2 lemons, about ¼ cup
1 teaspoon vanilla extract
For glaze:
1 cup confectioners’ sugar
Juice from 1 lemon, about 2 tablespoons
1 tablespoon cream
½ teaspoon vanilla extract
For berries:
4 cups assorted berries (I used frozen left-over berries)
½ cup granulated sugar
Preheat the oven to 350°. Lightly coat a 9” x 5” loaf pan with vegetable oil spray. Fit a piece of parchment paper into the pan with some of the sheets overlapping so that you can use the paper to remove the cake after baking. Then spray the paper.
Whisk together the flour, baking powder and salt.
Use an electric mixer to combine the butter and 1 cup sugar until creamy and smooth. Stir in the eggs, one at a time. Stir in the lemon zest and juice from 2 lemons, sour cream, and vanilla. Add the flour about ½ cup at a time, until the batter is just mixed together. Pour the batter into the loaf pan. Bake until a tester inserted into the center of the cake comes out clean, about 45 to 60 minutes. Cool the pan on the rack for 30 minutes, then transfer the cake from the pan to the rack to cool completely.
While the cake cools, stir together the confectioners’ sugar, juice from 1 lemon, cream, and vanilla. The glaze will be thick, but pourable. Place the cake onto your serving platter. Pour the glaze over top.
Place the berries and ½ cup sugar into a deep saucepan and simmer over medium-low heat. Cook the berries until they break down and are soft and mushy. Cool to room temperature. Place a colander into a larger bowl. Push the berries through the colander, using the potato masher. You want most of the pulp and seeds to stay in the colander. Transfer what’s left in the bowl to a small pitcher.
Drizzle the sauce onto a plate. Top with a slice of cake and a few extra berries for garnish.
Best Cherry Tart Recipe
I have a thing with cherries. I love cherry pie, cherry jam, cherry chutney. Just eating freshly pitted cherries with grandson, Ben, is a blast. He loves the pitting!
On the flip side, I deeply dislike canned cherry pie filling; Don’t get me started!
So, I came up with a way to satisfy my cherry pie craving, using fresh cherries and time-saving refrigerated puff pastry dough. It’s easy and delish!
Serves:
Time:
Makes about 20 palm-sized tarts
30-Minute Cuisine
Ingredients
These little tarts are best warm from the oven. You can make them and freeze them and bake them off when you’re ready for a treat!
1 tablespoon coarse sugar (I used raspberry flavored coarse sugar)
Place the cherries into a deep saucepan. Add the sugar and splash in about 2 tablespoons of water. Heat the cherries over medium heat until they begin to breakdown and the sugar dissolves, about 5 to 8 minutes.
Stir together the cornstarch, lemon zest and juice until smooth and pour into the pot. Continue simmering until the cherries begin to bubble up the sides of the pan. Use a potato masher to mush together the cherries in the syrupy sauce. Continue simmering until the mixture resembles fruit jam. Remove the pot from the heat and cool to room temperature.
Place the dough onto your floured board or work surface. Roll out the dough to a rectangle about 15” x 18” and about 1/8-inch thickness. Cut the dough into four equal strips, horizontally and 5 equal pieces, vertically. You will end up with about 20 squares.
Preheat the oven to 425°. Place a colander into a larger bowl. Pour the cherries through the colander, using the potato masher to squeeze out as much of the juice as possible. Place a tablespoon of cherry filling on each square of dough. Fold the dough over and seal with the tines of a fork. I folded mine into triangles, but rectangles or squares are fine too! Place each tart onto a baking sheet lined with parchment paper. Brush each tart with the egg wash and sprinkle with coarse sugar. Bake until the tarts are puffed and golden, about 15 to 18 minutes.
Last summer I came across a YONANAS machine that turns frozen bananas into soft-serve ice cream’s next of kin. It was really FUN to work with. But, what truly amazed me was the book that came along with the machine. It has HUNDREDS of recipes for banana ice cream add-ins. Mint chocolate banana ice cream, triple berry banana ice cream, pistachio banana ice cream……
So, when I came back home, after a week-long trip, and saw the over-ripe bananas on the counter, I got inspired to make ice cream, until I remembered that my yonanas machine was not with me. The next best thing? Banana bread, of course! Inspired by my yonanas experience, I decided to kick things up a bit. After I prepared the batter, I poured half of it into the prepared pan. Then I mixed cocoa powder into the remaining half of the batter. I dolloped the chocolate onto the vanilla and swirled the two together. The bread is rich, light and perfect for an after-school treat.
Enjoy yours with a cup o’ Joe in the morning, or with a bowl of yonanas “ice cream” for dessert. It’s all good! And I’ve got pictures to prove it!
Chocolate Swirl Sour Cream Banana Bread
Serves a crowd
60 Minute Cuisine
A wonderful swirl of chocolate in a moist spiced banana bread. Perfect with a cup of tea!
1 ½ cup flour
1 teaspoon baking soda
½ teaspoon kosher salt
½ teaspoon ground cinnamon
¼ teaspoon ground nutmeg
½ cup butter, room temperature, 1 cup
1 cup granulated sugar
2 large eggs
½ cup sour cream
1 teaspoon vanilla extract
3 very ripe bananas, mashed
¼ cup cocoa powder
Preheat the oven to 350°. Whisk together the flour, baking soda, salt, cinnamon, and nutmeg in a small bowl.
Whisk together the butter and sugar. Whisk in the eggs, one at a time. Mix in the sour cream and vanilla. Whisk in the mushy bananas. Pour the flour on the top. Use a spoon or large whisk to combine all the batter ingredients. Pour half of the batter into a 9 X 9 X 2-inch baking dish that has been coated with vegetable oil spray and dusted with flour. Stir the cocoa powder into the remaining batter. Spoon the chocolate batter on top of the vanilla batter. Use a knife to cut through the batter, swirling the chocolate into the vanilla. Bake until a tester inserted in the middle of the bread comes out clean, about 35 to 40 minutes. Cool in the pan and cut into wedges.
This is an example of the yummy farmer’s market pizza I’m talkin’ about!
I’m going to let you in on a little secret. The real reason so many hungry shoppers get out of bed on Saturday morning is to hit the local farmer’s market for samples of yummy breakfasts. You’ll taste everything from uber-large frosted muffins, tub-size cinnamon rolls, piled high ham, to biscuit sammies. And then there’s the pizza truck…!
Boasting a wood fire oven, the truck is parked so that every strolling patron is forced to pass by. Oh yes, there’s the pepperoni and sausage pizza, as well as the white pizza with freshly picked basil for topping. But, the most popular by far is the breakfast pizza – or my own version, which is more of a flatbread. It’s piled high with what I like to call “everything breakfast”: eggs, cheese bacon and sausage. Then there’s that surprise of sweetness to balance out the salt. Shoppers wait in line to place their order and then visit the farmer’s stalls while they wait for the pizza to come out of the oven. Once your name is called and the pizza handed over, you can see all the “where can I get me some of that?” smiles from yards away.
So, what do you do if it’s a rainy day, or your breakfast craving shows up during the week when farmer’s markets are closed? Here’s my make-it-at-home version of breakfast pizza that’s easily prepared, and tastes just like the one from the market. It’s just a little slice of breakfast heaven!
This is MY VERSION of the Farmer’s Market Pizzas I’ve so loved…RECIPE BELOW!
Breakfast Flatbreads
Serves 4
20 Minute Cuisine
2 green onions, thinly sliced, about 2 tablespoons
1 tablespoon olive oil
½ red bell pepper, diced, about 2 tablespoons
4 ounces bulk sausage
4 slices bacon
4 large eggs
½ teaspoon kosher salt
½ teaspoon coarse black pepper
4 ounces shredded Monterey jack cheese, about ½ cup
2 prepared flatbreads
2 tablespoons pure maple syrup
Preheat the oven to 400°. If you have a pizza stone you can heat the stone in the oven. Heat the olive oil in a skillet over medium heat. Add the onions, pepper and sausage. Cook until the sausage is browned and crumbled, about 3 to 5 minutes. Remove the sausage to a bowl. Let the skillet cool. Use paper towels to wipe out the skillet.
Place the bacon in the skillet, and cook over medium heat until browned and crisp, about 5 minutes. Remove the bacon to paper toweling to drain. Cool the skillet, pour off the excess fat, and use paper towels to wipe out the pan.
Whisk together the eggs in a small bowl. Pour the eggs into the skillet and cook over low heat until the eggs begin to form curds. You want to undercook the eggs rather than firmly scramble them. Season with salt and pepper.
Lay the flatbreads onto a baking sheet, layered with parchment paper. If you are using a stone, you can lay the flatbreads onto your pizza peel, dusted with flour. Top each flatbread with the cheese. Layer the sausage on top. Spoon the eggs over the sausage and cheese. Crumble the bacon on top of the eggs.
Bake the flatbreads until the eggs cook through and the cheese melts, about 5 to 8 minutes. Remove from the oven and drizzle the top of the flatbreads with maple syrup. Cut each one into four slices and dig in!
I have a new puppy, Brownie (obviously a food name…) who likes to wake up early! I find myself walking her at zero dark thirty in freezing temperatures wrapped in a long coat, gloves and scarf sweetly recommending that she “hurry up, good girl”. Flashback to that early Dunkin’ Donut commercial of that sweet, balding, old man waking up in the dark because it is “time to make the doughnuts!”
Doughnuts are a process. Make the dough, let it rise, cut out the circles, not forgetting the holes and frying them up in batches. Well worth the effort, yes, but what if we could short cut the procedure and have similar results?
Say, “Hello” to DOUGHNUT Muffins! I ran across a recipe in a recent issue of Fine Cooking magazine. I am a fan of their recipes because they explain the why behind the steps. It is almost a scientific approach to baking, which really helps the novice cooks. Of course I tweaked the recipe, just a bit, and will continue to do so, but for now these results are worth posting.
With the holidays upon us it is great to have an easy, go-to baked treat to start the morning off, or in my case to serve at my granddaughter’s Christmas tea party.
Let me know what you think and how you would tweak your doughnut muffins. Remember, Dunkin’ has seventy varieties and still counting!
Sugared Doughnut Muffins
Close your eyes and take a bite of this sugary, warm, light-as air treat and convince me you are not eating a doughnut! Then again, try a second one and convince yourself!
¾ cup unsalted butter, room temperature, 1 ½ sticks
1 cup granulated sugar
2 large eggs
1 teaspoon vanilla extract
3 cups unbleached all-purpose flour
2 ½ teaspoons baking powder
1 teaspoon salt
½ teaspoon ground nutmeg
¼ teaspoon baking soda
1 ½ cups milk
¼ cup buttermilk
For Topping
1 tablespoon cinnamon
¾ cup granulated sugar
6 tablespoon butter, melted, 3/4 stick
Spray a 12-cup muffin tin with vegetable oil spray and dust each cup with flour. Use an electric mixer to cream together ¾ cup softened butter with 1 cup sugar. Add the eggs one at a time and stir in the vanilla. Remove the bowl from the mixer.
Sift together the flour, baking powder, salt, nutmeg and baking soda into a bowl. Do this by putting all of the ingredients into a fine sieve colander and shaking it over the bowl. It works!
Stir together the milk and buttermilk in a third bowl.
Use a wooden spoon to stir ¼ of the flour into the butter. Stir in 1/3 of the milk. Stir until the ingredients are just combined, taking care not to overwork the batter. Continue this process until all of the ingredients are combined. The dough will be thick and sticky.
Use an ice-cream scoop to fill each cup in the tin. Bake the muffins until firm to the touch, about 30 to 35 minutes. Remove the muffin tin from the oven and allow the muffins to cool slightly. Carefully lift each muffin from the tin to a rack to cool for at least 5 minutes.
Stir together the cinnamon and sugar in a small bowl. Brush each muffin all over with melted butter. Sprinkle the cinnamon sugar over the tops, sides and even the bottoms of the muffins. Serve warm!
Variations
Brush warm muffins with maple syrup and dust with granulated sugar.
Add chopped blueberries or other fresh fruit to the batter before baking.
Add peppermint extract in place of vanilla. Brush the tops of the muffins with butter and sprinkle with crushed candy canes or peppermint candies.
Little Hands
Get everyone into the act when making these doughnut muffins. Little ones can brush the warm butter and sprinkle the toppings. Older kids can stir the ingredients together and wash up the bowls!